Best iOS 15 settings to be turned ON, enable them manually
Best iOS 15 settings to be turned ON, enable them manually immediately: It has been some time now since Apple rolled out iOS 15 for its users where they introduced some amazing settings and stuff. But somehow some of those amazing settings got turned off when users first installed the update. Most of these settings are not enabled by default, we have to manually turn them on to experience them. In this article, we have made a list of the latest iOS 15 settings as well as some older iPhone settings too that you can switch on manually, which might have got turned off when you first installed the iOS update.
1. Announce Notifications Through Headphones:
As we have “Announce Messages and Calls” in our older versions of iOS, Announce Notifications on iPhone in iOS 15 provides a more versatile experience. We can hear and respond to alerts in our headphones/earphones without having to unlock our device or say “Hey Siri.”
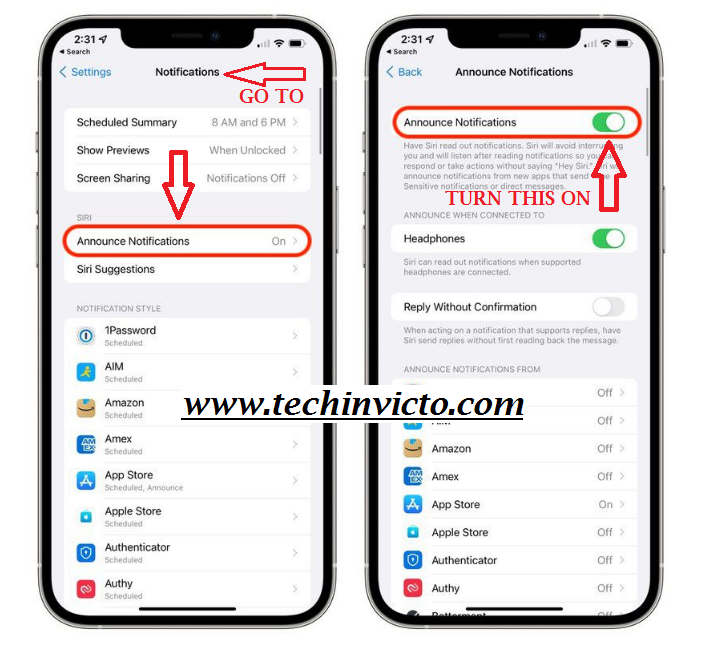
If we enable this setting, Siri will read out notifications without having to unlock our iPhone, only when 2nd generation AirPods and some Beats headphones are connected. This won’t let others hear about notifications as we can hear them through our headphones/earphones. Also, Siri will avoid interrupting you and will listen to your command after reading notifications, this will allow you to reply without even saying “Hey Siri.”
This is how you enable the Announce Notifications setting in iOS 15:
- Go to the Settings app on your iPhone.
- Swipe down and tap.
- In the top section choose “Announce Notifications”.
- Under the “ANNOUNCE WHEN CONNECTED TO” section, turn on the toggle next to Headphones.
2. Record App Activity setting to be enabled manually:
We all know that many apps collect our personal data. We all would eagerly want to know just how often they are doing so But how do we do that. But no worries, iOS 15 has a setting for this too. This is called Apple’s new App Privacy Report. This App Privacy Report is available on iOS 15, and it creates a summary of all the times your installed apps have collected your personal data over a period of seven days. This report comprises all the information regarding access to your location, microphone, photos, and contacts.
App Privacy Report also displays any third-party domains your apps may be getting in touch with. This allows you to know where your data could end up.
The App Privacy Report setting is kinda little hidden away in iOS 15, so if you want to turn the summary option on, follow the steps below.
- Start the Settings app and scroll down to ‘Privacy’.
- Tap ‘Record App Activity’ at the bottom of the “Privacy” menu
- Turn the ‘Record App Activity’ option ON.

Once you enable “Record App Activity,” your phone will now record when and how often your apps access your data, and you can return to this screen to see the full report.
ALSO READ:
How to Set Up a VPN on iPhone or iPad?
3. Enable the ‘Hide IP Address” iOS 15 settings:
Now you will ask us is it possible to hide our IP Address in the new iOS 15? The answer is yes, it is! In the latest iOS 15, Apple has updated its Intelligent Tracking Prevention feature in the Safari browser to prevent trackers from accessing your IP address, which blocks them to build a profile about you.
Apple has provided settings for this in the Safari browser, where you can enable the setting to hide your IP address. This makes you browse the internet with the next level of security that you wanted. This setting should be enabled or turned ON by default, but if it is not or maybe you turned it off for some reason, you can follow the following steps to turn it ON and hide your IP address on your iPhone.
Now let’s see, how to hide our IP Addresses in the new iOS 15?
- Go to the Settings app from your Home screen.
- Scroll down and tap Safari.
- Tap Hide IP Address.
- Tap From Trackers.
4. Enable the Find My Network setting manually:
Apple’s iOS 15 also has some more Best iOS 15 settings to be turned ON immediately. One of those settings is that Apple has improved the ‘Find My network’ feature on iOS 15 to help users find their iPhones quickly even when they’re off or in case of theft.
Apple’s iOS 15 ‘Find My network’ abilities comes in very handy in numerous scenarios, including when an iPhone has run low on battery power, maybe if you forgot where you have kept your iPhone, or even if a thief has stolen your iPhone and turned the phone off.
This iOS 15 feature works only when the Find My network feature has been enabled in your iPhone. Usually, by default, it’s on, but you better double-check by going to your profile, clicking on Find My, selecting Find My iPhone, and then making sure “Find My network” has been enabled.
5. Manually Turn On the Lossless Audio setting:
Apple iPhones are always known for providing the best audio and music experience to their users. Apple’s iOS 15 enables users to experience a rich lossless music experience. By “Lossless Audio”, Apple means that after compression and then decompression, the audio that you’re listening to is equivalent to the audio as it was recorded by the artist. This preserves the texture, detail, and sound that went into the music when it was created.
With Apple’s lossless audio, Apple Music subscribers can hear songs exactly as they were recorded by the artists in the studio and intended to be heard. But before you can engage yourself in this amazing music listening experience, you must make sure that this iOS feature is enabled in your iOS 15 iPhone.
Here’s how to turn on Apple Music Lossless Audio setting on your iPhone:
- Go to the Settings app on your iPhone.
- Scroll down and select Music.
- Tap Audio Quality.
- Tap the toggle for Lossless Audio to ON (green.
- Under Cellular Streaming, Wi-Fi Streaming, and Downloads, select the audio quality that you want. Lossless starts at up to 24-bit/48kHz, while High-Resolution Lossless goes up to 24-bit/192kHz.
6. Preserve Camera Mode Settings manually enable:
If you have a favorite filter or camera mode, then it must be very frustrating to have to select it, again and again, every time you open your camera on your iPhone. But, by the time you’re ready with your camera up, the special moment you wanted to seize could have gone forever. Here comes the very useful iOS 15 iPhone’s Preserve Camera Mode Setting which you can turn on or enable to get rid of such infuriating situations forever.
Let’s learn how to enable the iOS 15 iPhone’s Preserve Camera Mode Setting feature. To turn on these settings:
- Go to the Settings app on your iPhone.
- Tap on the Camera.
- Tap on Preserve Settings.
- Turn on Camera Mode.
- Turn on Live Photo.
7. Turn on Reduce White Point Setting in iOS 15 manually:
During the nighttime, even with your iPhone’s brightness slider turned all the way down, you must have witnessed that your display still seems too bright at night with all the lights shut off. This hurts the eye so badly, that you wanna switch your iPhone off and just go to bed. but something on Facebook or Instagram pulls you back towards it. In the end, your eyes have to pay the price.
So in order for you to continue scrolling through social media late at night in bed or maybe even enjoying a late-night Netflix binge without hurting your eyes, here’s one of the Best iOS 15 settings to be turned ON immediately, which will allow you to make your iPhone screen even dimmer and prevent strain on your eyes. This is called Reduce White Point Setting in iOS 15, and here’s how you can turn it on on your iPhone:
- Go to the Settings app on your iPhone.
- Tap ‘Accessibility’.
- Select ‘Display & Text Size’.
- Scroll down and toggle the switch ON next to ‘Reduce White Point’.

This setting decreases the intensity of bright colors on your iPhone’s display, which will result in a dimmer image overall. Now you can use the slider that seems to choose between 25% (the calmest setting) and 100% (the darkest setting).
Once you have turned ON/enabled these Best iOS 15 settings manually, you’ll enhance your overall Apple iPhone experience when you use it. Enjoy.